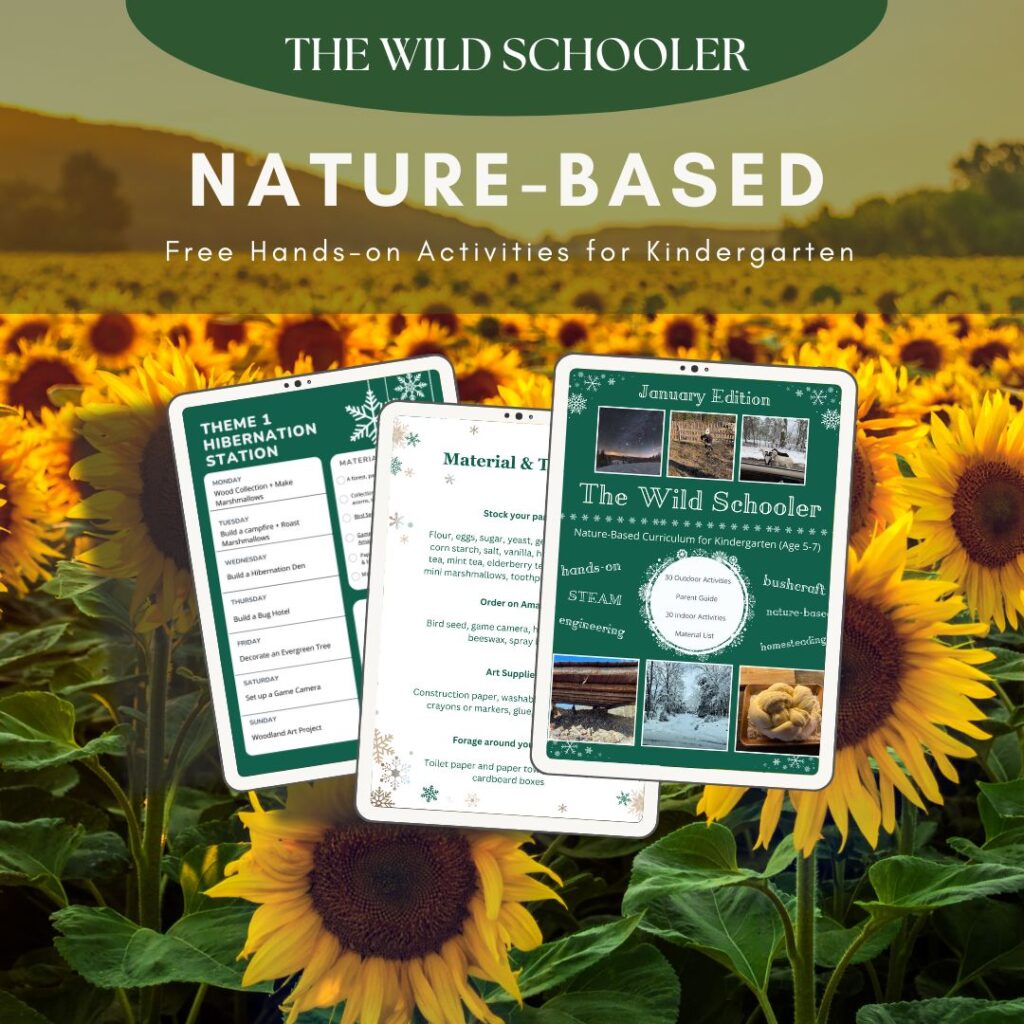
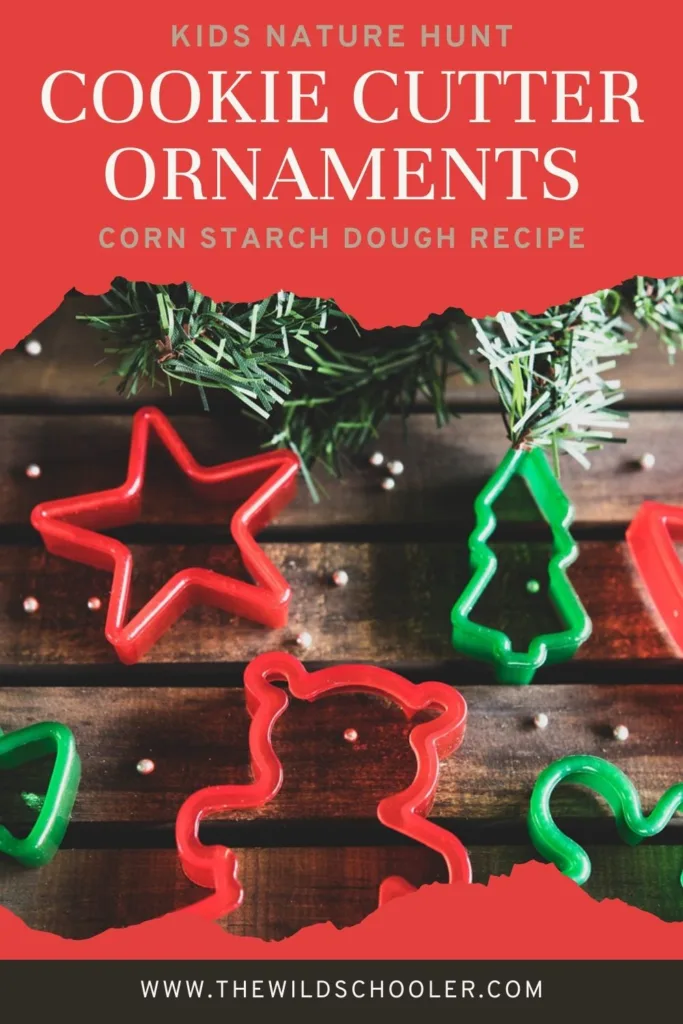
It’s time to take your little ones on an enchanting adventure into the heart of the forest this January. As part of our nature-based curriculum, we’re going on a magical nature hunt to gather pine needles, dried flowers, seeds, sticks, and other small treasures. And the best part? We’ll be using them to create charming cookie cutter ornaments with a simple flour and salt dough.
Let’s embark on a journey of creativity and exploration!
What to Forage for to Create These Cookie Cutter Ornaments
This fun holiday activity starts with a forest-school inspired hike in your backyard, park or nearby forest. When foraging, look for small treasures that can be easily pressed into the dough. We will seal them after so they don’t fall off. Keep in mind you can use these foraged treasures to create indents and paint the indents in the dough as well or leave them on the cookie shapes and seal the treasures in.
What can you find in the forest?
- Pine needles or Cedar needles
- Dried flowers and weeds
- Seeds
- Small, skinny sticks
- Leaves
- Juniper berries
Once you have a good collection of forest treasures, head on inside to a clear table or surface to start making your cookie ornament dough.
To make the no-bake cookie ornament dough, you will need to gather:
- Small cookie cutters
- Cookie sheet
- Twine or ribbon
- Flour
- Salt
- Water
- Mixing bowl
- Clear varnish or sealant like Mod Podge
Step 1: Hunt for Your Nature Ornament Decor
Head to the forest with your little ones and embark on a nature hunt for pine needles, dried flowers, seeds, sticks, and any other small pretty things you can find.
Engage your kindergarteners with questions like, “What colors do you see in nature? Can you find something rough or smooth?”
Step 2: Nature Exploration Discussion
Back home, sit down and explore the treasures you’ve collected.
Ask, “What did you find in the forest that you like the most? How do these items feel in your hands?” This is a great opportunity to discuss different textures, colors, and shapes.
Step 3: How to Make Cookie Ornament Dough
In a mixing bowl, have your child combine 4 cups of flour, 1 cup of salt, and 1 + 1/2 cup of water. Stir and kneed until the mixture forms a smooth dough. Add more water or flour as needed to create dough texture.
Ask your kindergarteners, “How does the dough feel in your hands? Can you describe its texture?” Let them explore the sensory aspects of the dough.
Step 4: Shape the Ornaments with Cookie Cutters
Roll out the cookie ornament dough on a flat surface and use cookie cutters to create fun shapes. Make sure to use a chopstick or similar tool to create a hole in the top of the ornament for hanging later.
Have your child press the collected forest treasures into the dough to create imprints. You may need to roll them over with a rolling pin to make sure they stick well. You can leave the treasures on the ornament and seal in step 6, or take them off and either paint the imprints or leave them natural.
Encourage your little ones to experiment with different combinations and arrangements. Ask things like, “What shape do you want to make? Where will you place the pine needles and seeds?”
Step 5: Baking the Cookie Cutter Ornaments
Bake the ornaments at a low temperature (around 200°F) for about an hour to harden them.
Discuss with your kindergarteners, “Do you want to air-dry the ornaments or use the oven? What do you think will happen to the dough when it dries or bakes?”
Step 6: Sealing the Nature Ornaments
To preserve your beautiful creations, consider applying a clear varnish or non-toxic sealant such as Mod Podge. This step adds a protective layer, making the ornaments more durable and long-lasting.
Ask your child, “How do you think the clear varnish will change the ornaments? Why is it important to seal them?”
Step 7: Decorating and Hanging the Ornaments
Once the ornaments are dry, let your little ones attach twine or ribbon through the holes to create hanging loops.
Discuss, “How do you they turned out? Who would you like to gift this ornament to?”
You’ve just turned a forest adventure into a creative masterpiece. This activity not only fosters an appreciation for nature but also provides an opportunity for sensory exploration and artistic expression.
Now, adorn your home or gift these handmade, sealed ornaments and celebrate the beauty of the winter forest with your kindergarteners!